This post is a very basic introduction to autoguiding. My experience, although limited, has been very positive and I am keen to recommend that everyone takes a look at autoguiding.
Overview
- What is Autoguiding?
- Why Autoguide?
- How do I Autoguide?
- How to Setup Autoguiding?
- What is Dithering?
- Common Autoguiding Errors
- Useful Links
What is Autoguiding?
Autoguiding is the ability of the telescope to track a target by compensating for the inaccuracies of the mount, also known as Periodic Error. Even expensive mounts are not able to track in Right Ascension or Declination without pointing errors. These offsets can be small but will build up over time and are a result of slippage/backlash in the gears or belt drive or external influences like wind. An incorrectly balanced scope can also increase tracking errors.
Autoguiding is a way to overcome these issues.
Why Autoguide?
The main reason for autoguiding is to enhance the mount tracking allowing longer image exposures. Longer exposures gather more photons which makes stacking easier and improves the resulting images.
With autoguiding comes the ability to dither between images. Dithering is a great aid in reducing image noise.
There are exceptions such as the open source program N.I.N.A. where dithering can be made without autoguiding in smaller wide angle telescopes.
How do I Autoguide?
Athough autoguiding can function using an Off-Axis-Guider (OAG) we will not discuss that here. Mainly because it can be difficult to focus both cameras at the same time. One big disadvantage of OAG is the difficulty to find a guide star.
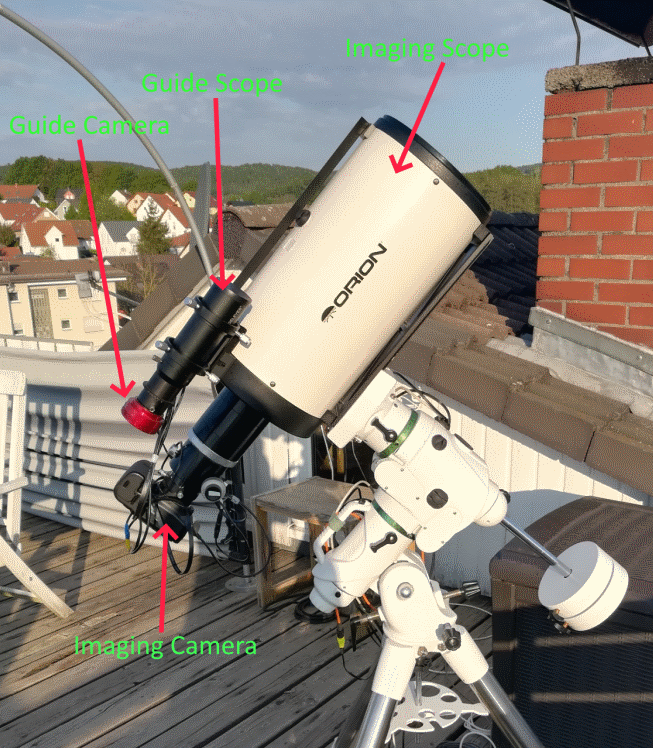
In this post we will discuss the use of autoguiding with an additional short focal length wide angle scope with its own camera attached.
Using a wide angle scope makes finding a guide star easier and in most cases the software can be left with the default settings.
How to Setup Autoguiding?
There are many free software programmes that can be used for autoguiding. My setup uses the internal autoguiding software that comes with the StellarMate INDI software. External programmes such as PHD2 can also be selected. Push Here Dummy (PHD2) is one of the best known free autoguiding software.
Autoguiding connections are very simple. If the mount supports a direct connection with Pulseguide this is the preferred method bypassing the hand controller with a special USB cable. The guide camera is connected to the control computer using a USB cable.
Most guide cameras have an ST-4 output but as modern software supports the direct Pulseguide connection to the mount this is the preferred method.
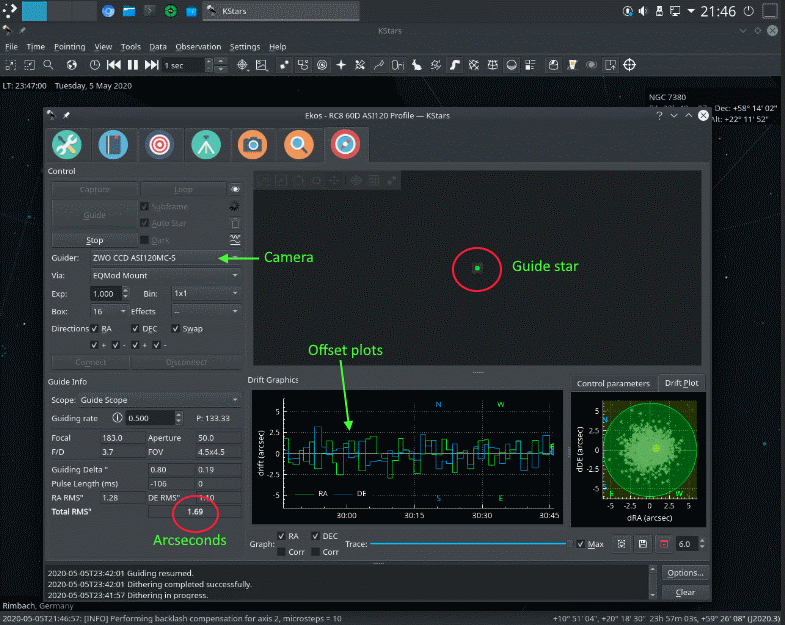
No matter which software you choose the best advice is to begin using the default settings. Many astronomers spend hours trying to improve their autoguiding. My system began with tracking better than 1 arcsecond, however, in the last few days this has increased to 2 arcseconds. As I consider 2 arcseconds to be acceptable for now I am happy with the settings.
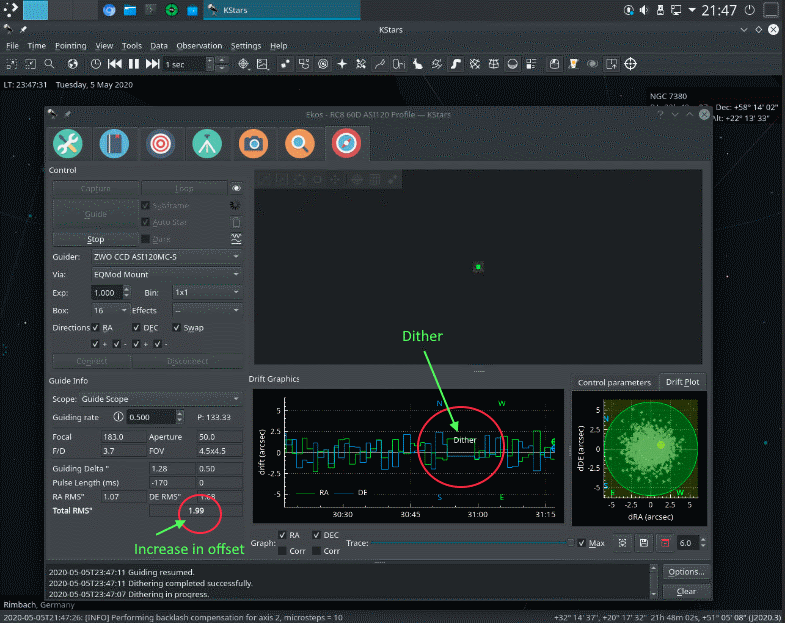
What is Dithering?
Between image taking the software will add a delay before the next image and insert an offset by a fixed amount of pixels. This offset is called dithering and is applied in a random direction which varies from one picture to the next.
The dithering offset value is chosen by the end user with the value set depending upon the type of camera. A DSLR is recommended to move by 15 arcseconds whereas a cooled camera may only require 10 arcseconds.
The dithering offset is applied to the autoguiding camera which means that it will be a small oofset compared to the imaging camera.
I have dithering set to 2 pixels on the guide scope. With my setup the calculations are shown below.
- Image resolution = 206.265 * pixel size/focal length
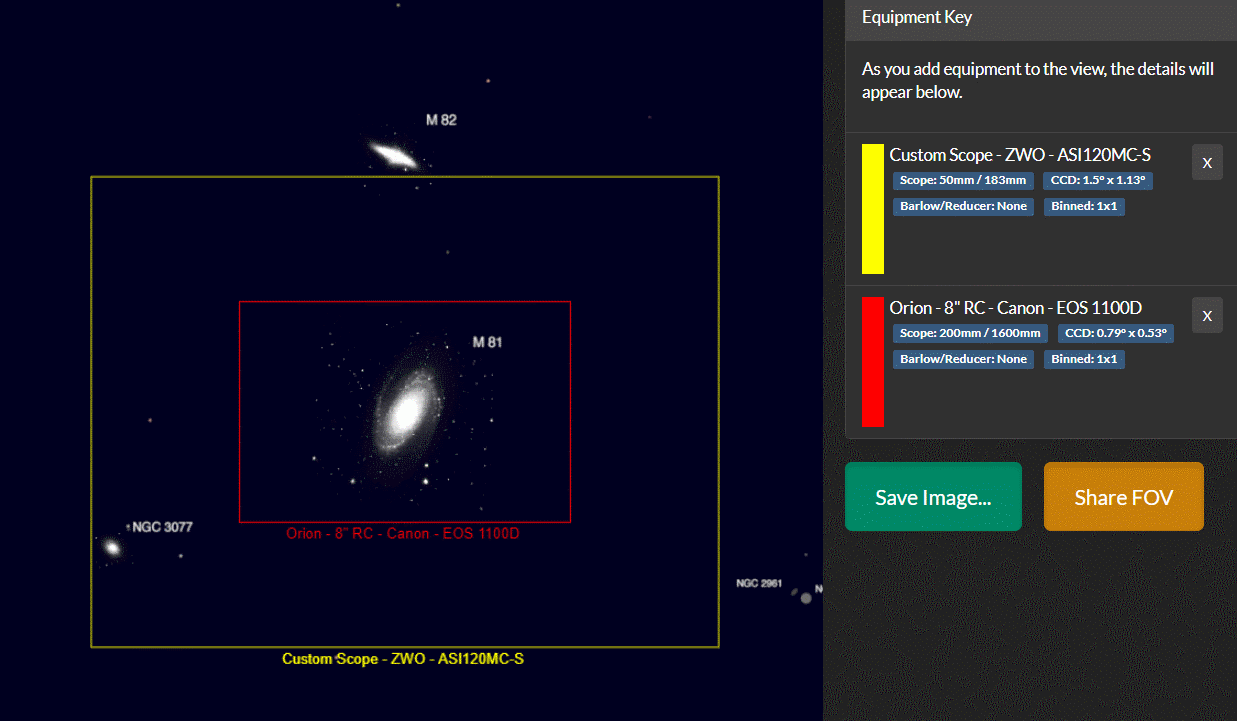
- Imaging camera is Canon EOS 1100D, 5.19 um pixel on Orion RC8 203/1624mm. Resolution = 0.66″/pixel
- Guide camera is ASI120MC-S, 3.75 um pixel on a 50mm/183mm guide scope. Resolution = 4.23″/pixel
- Guide pixel offset
= Image pixel offset * image scope resolution / guide scope resolution - To get a shift of 15 pixels on the image I would have to set the dither to
15×0.66/4.23 = 2.34 pixels on the guide scope - My settings give a dither on the image of 2×4.23/0.66 = 12.82 pixels
Common Autoguiding Errors
There are many reasons why autoguiding can fail. Here are some of the common reasons.
- Out of focus guide scope
- Incorrect polar alignment
- Mount is not level
- Mechanical error in mount
- Bad seeing
- Incorrect balance of the telescope
- Cable management. A dragging or hanging cable is enough to cause off pointing
- Incorrect autoguider settings
Useful Autoguiding and Dithering Links
- https://themcdonalds.net/richard/wp/astrophotography-equipment-autoguiding/
- https://skyandtelescope.org/astronomy-resources/guiding-a-telescope-for-imaging/
- http://www.astropix.com/html/i_astrop/Diagnosing_Trailed_Stars.html
- https://themcdonalds.net/richard/wp/astrophotography-mounts-periodic-error-correction/
- https://skyandtelescope.org/astronomy-blogs/astrophotography-jerry-lodriguss/why-how-dither-astro-images/
- http://www.astrofriend.eu/astronomy/projects/project-kstars-raspberrypi4/01-project-kstars-raspberrypi4.html